
January 1998
Building a Simple (and not too Inexpensive)
Wave Generation Model
Bruce "Snake" Gabrielson, PhD
January 1998
Years ago I was continually asked to demonstrate the effects of bottom slope and contour on wave shape by students during my lectures. Since waves are scalable, shape is the most important consideration for the simulation design. After thinking the problem through, I finally came up with a design that was relatively inexpensive to build, I could transport and set-up easily, and would effectively demonstrate what I was talking about. I built the first model in 1981. It was plastic, but it wasn't sturdy enough to survive more than a few road trips. The second model, built from stainless steel, is still useable after many years. Unfortunately, it doesn't show the waves as well as the plastic model. I've provided this design to many students for graduate projects. I should also mention that although a little messy, the model can also be used to demonstrate beach erosion.
For a little background, when a wave moves in the open ocean, the sea bottom has virtually no effect and the wave energy moves based on its period. However, when a wave approaches the coastline, the shallower water causes the bottom of the wave to drag along the ocean floor. How much of a slow down and how the wave is formed is dependent on the water depth and irregularity of the bottom contours.
If a wave hits a steep incline into shallow water over a short distance, the wave height increases substantially, resulting in very large wave faces. This is because the first waves to hit the incline slow down while the following waves are still approaching at their open water speed. The energy in the waves starts to compress and combine with other waves since these waves are now closer together. This combined energy pushes the top of the wave up, while the combination of gravity and momentum at the top of the wave causes the top of the wave to break forward.
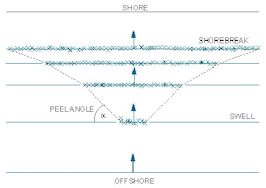
Refraction is the primary controlling factor in how the shape of the wave is formed and also how long the breaking wave might last. Waves break in a progressive manner. Since the contour of the ocean bottom is not uniform, one part of a wave crest could have more drag than other parts causing the slower moving part of the wave to bend slightly. Refraction always turns the waves towards the slower moving water (the shallower area).
A good description of how a wave progressively breaks is available from Artificial Coastal Management. According to their web site, peel angle (see their figure) is related to the wave breaking location, which is determined by water depth and wave characteristics. Generally, waves start to break when the wave height is approx. 1 to 0.7 times the water depth. Thus, a 1m wave will break in approx. 1 to 1.4m of water. If the seabed at this depth has contours which are parallel to the direction of the wave crests, the wave will break almost simultaneously along the crest and the wave will 'close out' [i.e. peel angle is close to zero]. If the wave encounters a variable depth along the length of the crest [as is the case for oblique swells, desirable bar formations and natural or artificial reefs], the wave will break at the shallow point initially and then progressively along the crest as the wave moves onshore
This is what I initially did to look at simple wave shapes and keep my costs down. I built a rectangular water container from plastic. Mine is approximately 2 1/2 ft by 4 1/2 feet so it will fit into the back of a car, but I now feel a better container would be 3 ft by 5 ft. The sides should be at least 8 inches high (8 would be better), and all seems should be thoroughly sealed. This makes an easily transportable pool that can sit on a table.
To generate the wave, I built a simple arrangement from a 2" by 4" mounted in a wooden bracket at one end of the pool. At first I could generate waves by pushing up and down. Now I have a pneumatic plunger so I can measure exact pressure. Remember that reflections from the pool end and sides will quickly ruin your waveshape, unless your model channels the reflection, after 2 or 3 successive generations. So you don't need something that produces a constant up and down motion. Add some food coloring to the water and use an overhead light for best visibility.
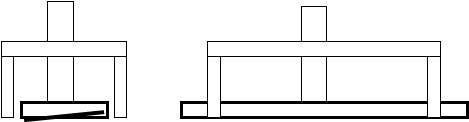
The bottom of the plunger should have a very slight taper for best results. The figure shows more than is required. Basically, you want just enough to force the wave forward easily. A few passes with a grinder on the bottom plunger will work.
One end of your pool wioll need to have a slight slope to represent the contour of the land as the wave approaches. Use insulating styrofoam sheets glued together and then slightly tapered again with a grinder or surform. These need to be glued to the bottom at one end using waterproof glue.
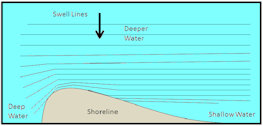
The bottom reef designs are heavy but also rugged. If you aren't planning to represent an actual breaking wave, a brick will work to show how swell lines are reflected and bent. In the real world, swell lines bend as shown below.
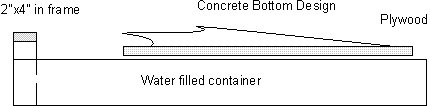
For a real reef model, one can be cheaply built with concrete on top of a piece of 1/4 inch plywood that fits inside your pool. Use wet but not runny concrete and hand shape the design you want. Make sure you use rubber gloves or your hands will suffer. Also, build the bottom model outside as it will be messy. Once the concrete gets hard in a few days, spray it with water sealant or it will crack easily. Also, don't handle the bottom model too rough or it will crack and separate from the plywood. One way to prevent this is to pound some short nails from the bottom through the plywood before making the concrete model and then shaping the concrete around the nails. Cut off any nail tips that stick up through the concrete. I painted my bottom models white and use slightly tinted water so the wave action shows up better. Remember, your looking at the break from above.
I built five models over a two-year period. My first was terrible but my last worked quite well. The model is really trial and error. Expect to make a couple mistakes before you get what you want. Also, don't let the model get above 4 inches high, counting the plywood, or water will spill out of your container.
A number of students have built this pool model over the eyars. I hope this gives you some ideas. I would also be interested in reviewing your dissertation or project report when you complete it. You have my permission to use my name as a reference.
The pictures below are from Pam Shea who built one of these pools for her son's school project. I like them better then pictures of my pool since this pool was built of plexiglass and wave action and underwater structures are clearly visible. The drawback of using plexiglass is that you can't simply lift the pool up to quickly drain it or it will spring a leak. I need to empty and remove my pool very quickly after demonstrations.
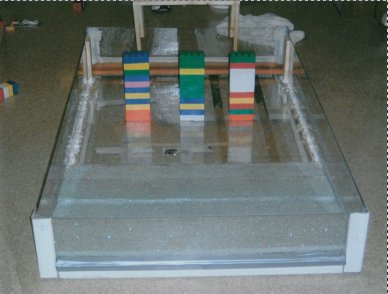
View from Beach Towards Plunger
The blocks are marked to allow measurement of wave height with different orientations of the blocks.

View from Plunger Towards Slope in Beach
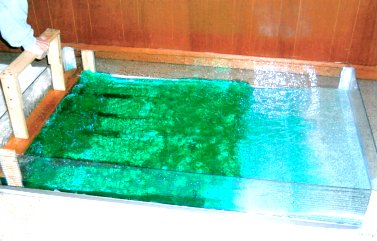
Veiw Showing a Breaking Wave on the Beach
Notice that by using colored water the wave action is easier to see.

View of Filled Pool With No Waves